The
Glyn Johns Method
A quick primer for recording drums
Introduction
Recording a drum kit is arguably the most difficult of all sound
engineering tasks. The number of individual sound sources and vast range of
different frequencies covered by a set of drums and cymbals makes obtaining a
good drum sound a challenge for even the most experienced studio engineer. One
way to meet this challenge is to use one of the many well-established techniques
developed by experienced audio engineers over years of professional studio
recording.
This primer is intended to provide an illustrated step-by-step guide to
using one of the most reliable and simple drum recording methods, pioneered by
legendary producer Glyn Johns during the late 1960s and 1970s. The Glyn Johns method
is a simple, fast and reliable way to achieve an open, live and realistic drum
sound using a small amount of recording equipment.
Glyn
Johns
Glyn Johns is one of the
Johns is probably best known in the drumming community for his legendary
drum sound. His unique recording method was used to create many of John Bonham
and Keith Moon’s best recordings.
The signature Glyn Johns sound is a massive, live, open tone.
Surprisingly, Johns achieves this huge sound using only four microphones. It’s
a simple technique to learn and requires relatively little studio hardware to
produce. In this article we’ll be looking at ways to achieve a great
Johns-style drum sound in the same way that John Bonham used to record.
What
you’ll need
The microphone cabinet
The classic Glyn Johns sound is produced by using only four microphones.
You’ll need two overheads (preferably large diaphragm cardiod types), one bass
drum mic and one snare mic. The following list includes approximate
Possible budget microphones for your setup are:
Overheads: 2 x Audio Technica AT2020 (65 GBP each)
Snare: Shure SM57 (70 GBP)
Bass drum: Audix D6 (130 GBP)
Accessories
4 x mic stands (10 GBP each)
Powered mixer: Soundcraft
Folio Notepad (50 GBP)
USB box: Edirol UA-5
(125 GBP)
Laptop: any PC, Mac or
Linux box (see Software below for suggested software)
4 x high quality balanced XLR
cables (mics to mixer)
2 x high quality balanced XLR
cables (mixer to USB audio box)
1 x high quality USB cable
(USB audio box to laptop)
Tape measure
Headphones
Getting
started
The room
Find a room in which your kit sounds good. The major advantage of using
this technique is that it provides a big, open, natural sound, so find a room
with a good natural reverb. Size isn’t important; small rooms can sound as good
as large rooms. You can control how bright or harsh the room sounds by covering
bare walls with curtains or drapes.
Tuning the kit
A well-tuned kit will record better than a set of cardboard-sounding
tubs. Obvious but true. Before the recording session, spend
New heads
It’s surprising how quickly drum heads start to sound tired. This is
particularly true of snare heads so change your snare batter head and tune the
snare before the session. You’ll get more bite out of the snare sound if you
use a new head. Many drummers keep the same heads on their gear for years -
it's all part of developing a signature sound!
Kit positioning
Start by setting up your bass drum, toms, hi-hats and snare in the
centre of the room. If possible, get someone else to play your kit and listen
to how it sounds, then move the kit to a different place in the room and listen
again. You’ll get a feel for the point in the room where the kit sounds best.
Avoid areas that make your kit sound flat or quiet. When you’ve found the
room’s sweet spot, assemble the rest of the kit and start setting up the mics.
Basic
principles
The basic Glyn Johns technique uses four microphones: two overheads, one
snare and one bass drum microphone.
Most of the recorded sound is taken from the overheads. They provide the
stereo image, warmth, clarity, and ‘crack’ from the snare. The snare and bass
drum mics are used to round out the sound, providing body and attack for the
snare and bottom end punch for the bass drum.
Forget what you might already know about overheads. Conventional
overheads are usually positioned using XY pairing, where both overheads are
placed high above the kit. In the Glyn Johns method, one of the ‘overheads’ is
used as a side mic, out to the right of the drummer beyond the floor tom.
That’s intentional. It looks bizarre but it works.
Positioning
and panning the microphones
The four microphones should be positioned and panned as follows:
Overhead 1: in front of the
drummer, 36-40” above the snare, pointing directly downwards at the bass drum
pedal between the bass drum-mounted toms. Pan right (
Overhead 2: to the right of
the drummer, 4-6” above the top of the floor tom pointing across the top of the
snare towards the hi-hats. Pan left (
Snare: pointing at the
centre of the top of the snare, 2-3” from the head, positioned between the
hi-hat stand and the crash cymbal stand. Pan centre (
Bass drum: depending on
the mic and your required sound, either inside the bass drum and close to the
head (more attack) or outside the bass drum. Pan centre (

Figure 1: the
basic Glyn Johns microphone setup

Figure 2:
Drummer’s view of the Glyn Johns microphone setup
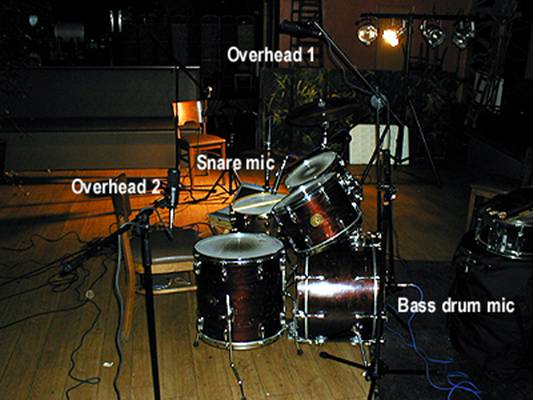
Figure 3: Side
view of the Glyn Johns microphone setup
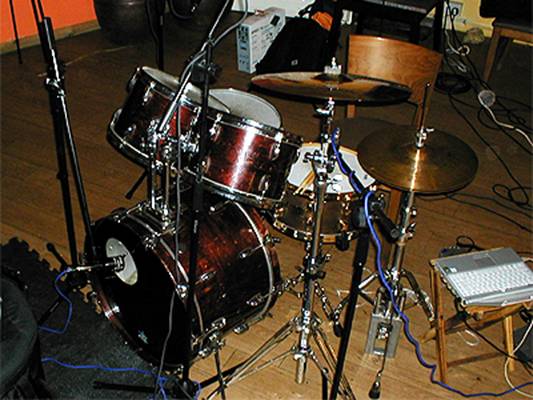
Figure 4: front
view of the Glyn Johns method showing snare and kick mic positioning
Connecting
the equipment together
Buy high quality balanced XLR cables to connect the mics to your mixer
and the mixer to your USB audio box, and
Levels,
gain structure and headroom
To start recording, turn on the mic phantom power supply on the mixer
and start setting gain and volume pots. You’re looking to achieve a final recording
volume that gives plenty of headroom, and no clipping (pushing the signal meter
into the red.) Digital clipping sounds awful so make sure that your loudest
drum sound - usually a snare accent or rimshot - doesn’t cause your recorded
signal to clip. Spend
EQ
Don’t apply EQ when recording using this technique. Set your mixer EQ
pots to neutral and perform any EQ during later mixing.
Tweaking
your sound
If you need more hi-hat in your mix, move the snare mic clockwise around
the circumference of the snare to point in the direction of the drummer’s left
leg. To reduce bleed from the hi-hat, move the snare mic anticlockwise around
the snare so that it points away from the hi-hat towards the drummer’s right
leg.
If you’re looking for more attack from your bass drum sound, move the
bass drum mic closer to the beater, change beater type or use a click pad on
the bass drum head.
Experiment with overhead placing. If you place your cymbals high then be
careful to keep them away from the overheads. Avoid placing your main overhead
directly above a cymbal or you’ll lose the body and tone of the cymbal.
Be careful not to place your snare and bass drum mics too close to the
corresponding drum head, or you may experience proximity effect – unwanted,
enhanced bass response.
Open up the stereo image by moving the floor tom overhead further around
to the right of and behind the drummer. Remember to keep the distance between
the mic diaphragm and the snare centre identical to the measurement between the
snare and the main overhead’s diaphragm.
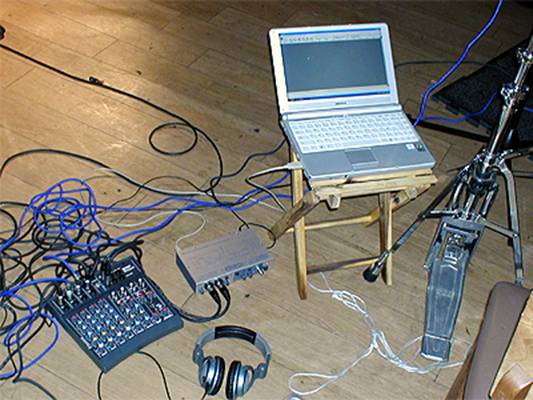
Figure 5: view
showing outboard recording gear and laptop
Conclusion
With a little experimentation, the Glyn Johns method makes it possible
to achieve impressive results using a relatively small and easily portable
amount of studio equipment. If you’re looking for a reliable, reproducible,
simple and quick drum micing technique that produces a live, punchy, natural
tone from a kit, then the Glyn Johns method is definitely worth auditioning.
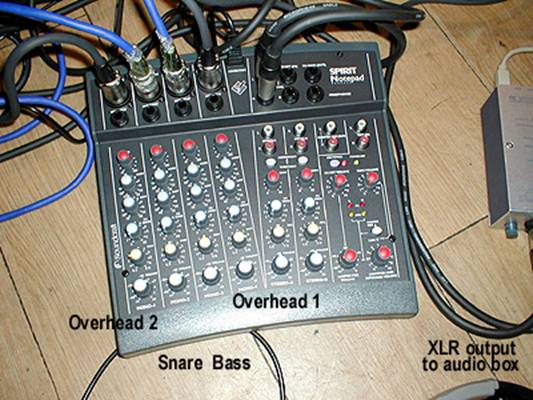
Figure 6: Mixer
view showing simple pan settings, EQ and levels for each microphone
Software
Audio software doesn’t have to be painfully expensive. The following Windows
programs can be downloaded without charge.
Audacity: free, open
source software for recording and editing sounds.
http://audacity.sourceforge.net
Reaper: a powerful
Windows application for multitrack audio recording and editing.
References
Glyn Johns
biography
http://en.wikipedia.org/wiki/Glyn_Johns
Basic layout mic
setup diagrams
http://www.danalexanderaudio.com/glynjohns.htm
Detailed
discussion of an enhanced version of the Glyn Johns method
http://forums.musicplayer.com/ubbthreads.php/ubb/showflat/Number/780024/page/2
May 2007